Sunday, October 6, 2013

DIY Wreck it Ralph

Halloween 2013 Part 2

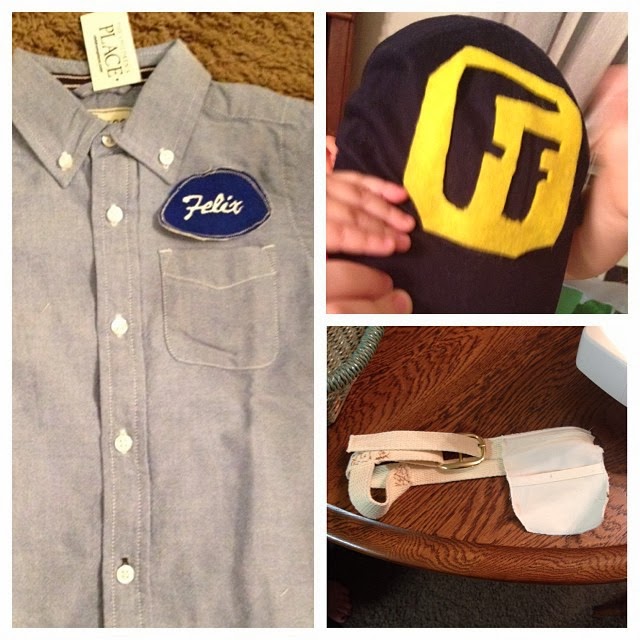
 I had originally planned on having Wreck it Ralph and Fix it Felix all in one post but Fix it Felix was pretty tedious and required a rather large post. Please Click here to view the Fix it Felix DIY blog post. 


DIY Wreck it Ralph 


Supplies and Cost


After doing Fix it Felix, this one was a breeze! First thing's first, I had to find a pair of overalls. That was the hardest part! I ended up getting these from a friend for FREE. They're size 24 months. This is my 4 and a half year old son. He typically wears a size 5. They were too short but I was cutting them off at the bottom anyway so it didn't matter. Keep that in mind if you can't find any in the size you need. Then I got: a hunter green tshirt ($4 at walmart), an orange tshirt($4 at walmart), 3 buttons(already had), dark brown RIT dye($2.50 at walmart)for the overalls, a light blue sharpie, and a red sharpie(73 cents each). If you're still adding, I'll help you out! That totals $11.95. Consider the fact he'll wear the hunter green shirt again and that brings it down to $7.95! This ninja turtle he'd also considered is nearly $40! I saved a TON of money on this one. Even if you had to purchase the overalls, you're still coming out much cheaper with this DIY project than the typical cost of a costume.

How I did it

The overalls: The ones I bought were khaki colored so it wasn't very difficult to go darker. If I had bought blue jean ones I would have bleached them first. I dyed in the washer and had great results. I cut the strap off the back so it wouldn't dangle down and bother him and I cut the bottoms to give them a frayed look. I did all cutting before the dying/washing process so it gave it a more tattered look. I also jagged up the knees a bit and cut the pockets off that were on them. After all that, I hand sewed down the front because it naturally wanted to stay up, not flop over like it should. It only took a couple stitches. 

The shirts: The hunter green shirt goes underneath with no editing necessary. I did roll up the sleeves since the orange shirt sleeves are cut, so you couldn't see the green at the sleeve. The orange shirt I cut a jagged sleeve and I cut the neck to give it that v-neck look. I then hand sewed on the buttons to make it look like they were really a part of the shirt. It looks really good, I think! To do the plaid, I drew light blue lines like checkerboard pattern and then lightly colored in the top row with the red. I didn't do it very thick or heavy and didn't fill it in completely. This gave it the plaid color look of Wreck it Ralph's shirt. It wasn't necessary to color the bottom row as it's covered by the overalls. 

That's it! 

No, really. That's really it! I threw in a little hair gel and spiked his hair up. I will probably let him wear flip flops when we trick or treat for safety but for halloween costumes (in our church) I'll just let him run barefooted. Be sure to check out the DIY Fix it Felix Blog Post!!


DIY Fix it Felix Jr

Halloween 2013

I remember when I found out I was pregnant, I thought about being one of  those moms that home made everything from scratch. That thought didn't last long! I laughed at the very idea because I knew that I was far from handy OR crafty. Well, look at me now! 

There were several posts on Pinterest with DIY Fix it Felix and a couple for Wreck it Ralph but none that had everything I wanted to accomplish. I'm going to try to break it down as best as I can since I didn't really take pictures while I was making it. Please visit This Post to view DIY Wreck it Ralph.

Fix it Felix Jr.


Supplies and Cost

Fix it Felix was a cheap and easy DIY project but it was a bit tedious. The first thing I got was the shirt, for $12 at Children's Place, and the boots were $10 at Walmart. I got long sleeved because if it's cold I can roll the sleeves down. I figured those items he'll be able to wear again as well! He already had jeans, hammer, and the hat, which was a bit off color but I think it still looks good. I bought a blue bandana from Hobby Lobby for 69 cents. The belt buckle was about a dollar and the strap that I used for the belt was a dollar a yard (I only needed 1 yard). I bought a canvas pouch that would tie around the waist, also at Hobby Lobby, for $2. Finally, I got a piece of yellow felt for 23 cents at Walmart, some white puffy paint for $2, and gold spray paint for about $6. If you're still adding, I'll help you out! That totals $34.92. If you exclude the fact that I would have bought the shirt and boots anyway since he can wear them all fall/winter, that's only 12.92!! This tiger costume I had considered is $37 on Amazon BEFORE shipping. I think I did pretty good!

How I did it

The hat: Felt cut out the Fix it Felix logo (as best as I could!) hand sewn on in the corners so I can later take it off and reuse the hat.

The belt: The belt was made from a strap I got at Hobby Lobby. All I did was attach the buckle by folding it around and under and hand sewing it in place. I made the hole where I wanted it using a small screwdriver. I then cut the pockets from the canvas pouch I got at Hobby Lobby. I cut them down a lot because the full sized pocket was way too big for his little legs! I sewed around the edge with a zig zag stitch to prevent fraying and sewed them in place on the belt. I also used an extra strip of the strap to make a hammer holder. I hand stitched it on but looking back, I could have done it much faster with the machine.

The patch: I typed up the font on the computer and printed it out. I then cut a single layer from the bandana. It is thin enough you can see the font through the bandana when you place the paper underneath. I didn't bother trying to trace it, I went straight at it with the puffy paint and it turned out GREAT! I then sewed the patch to a square of canvas (leftover from the pouch for the pockets). I sewed using a tight zigzag stitch and did it in the oval shape like I wanted. I didn't do it perfect. At all. I've only been sewing for about a month and usually straight lines. Don't stress over it. I then cut it out along the edge and hand sewed it on the shirt. I got lucky and had a thread that was EXACT to the bandana color so you couldn't see how little I actually sewed and how spacey it was. I wanted to be able to cut it off and reuse the shirt later. 

The hammer: 
Learn from my mistakes. 

Only do one layer of paint.
(Doing more will cause it to remain tacky and not dry properly)
Don't paint it on a plate
(It will stick and pull off the paint which will make you do MORE layers)
Let it dry overnight before touching
(Or you'll get fingerprints)
Don't let them play with the hammer until halloween
(they'll pound the paint right off)

Now, with all that being said, I ended up having to buy another hammer and start all over. Luckily, big lots had a tool kit for $7 which they will play with again and again. This new hammer had a little hole in the bottom and I put a small screwdriver in it to hold it while I spray painted it and then blow dried it on low cool for about 10 minutes and then propped it up to dry overnight. 

Well, I think that about covers it! I have decided against the gloves since it'll be enough fight for him to keep the hat on and not throw the hammer. I hope you all enjoy! Please visit This Link for Wreck it Ralph DIY.